With the recent update to a feature of the PlayStation 5, Sony has allowed it to support NVMe and SSD drives so you can upgrade the minimal storage it has.
After nearly two years since the launch of the PlayStation 5, Sony allowed M.2 SSD support, so you could increase the storage capacity and effortlessly move between the console’s storage and the M.2 SSD . Although it was unclear what specifications are required for the PlayStation 5, CGMagazine were able to experiment with the information that was given from the beta. We were able to test out the fastest consumer of NVMe and SSD drives currently available. This could possibly spark competition between the customizability of a PC and a PS5.
What is an M.2 SSD?
Short for Solid State Drive, SSD’s are basically the storage components of any hardware device. While the M.2 refers to the specifications of the SSD for easier compatibility identification.
Alternatively, you could use a NVMe for better results. NVMe stands for Non-Volatile Memory Express and it is far superior to a SSD when it comes to the speed and capacity of your storage.
After you have installed either the NVMe or SSD, you are ready to take full advantage of the expansive storage of your NVMe. All it takes is little to no time to increase your storage capacity and to freely move between your Playstation 5’s console storage and the added M.2 to maximize optimization.
Should you upgrade your storage?
Although, you may be asking yourself why you should upgrade the PS5 storage, “isn’t 1TB more than enough?” NAY, it is not enough nowadays, since the evolution of video games has increased the vast content a game could offer. I’m sure that at some point you have had to delete a game, so you could download the latest update to your favourite game, or maybe you wanted something different. There are even some games that are up to 100GB worth of storage. In an instant, 10% of your console’s pre-built storage is filled up with data.
It has been a while since the reveal of the NVMe expansion slot inside the Playstation5, many people were anticipating Sony to unlock the potential that lies within. For those who are unaware, the previous models of the Playstations included hard drive upgrades as part of the default state at launch. Sadly, it disabled by Sony before they finally launched the new firmware update that allowed compatibility; even inexperienced people are able to do it themselves with a bit of guidance that we’ll be giving.
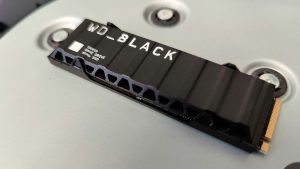
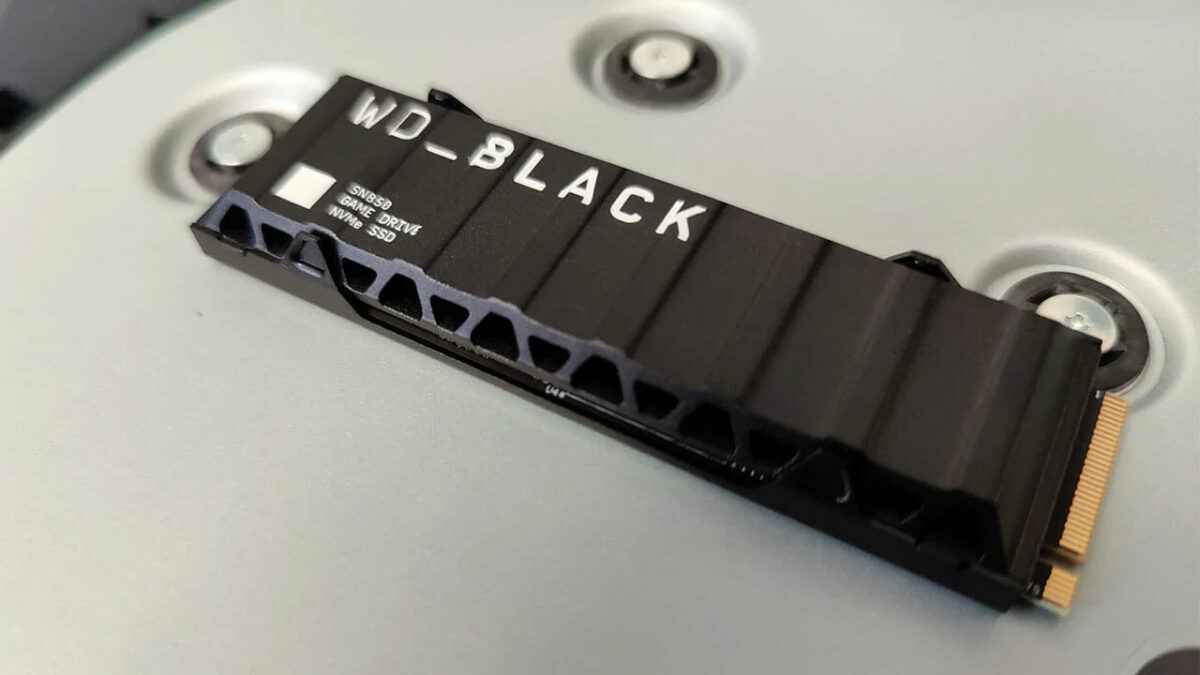
But before you go any further, make sure that the NVMe or SSD you will be purchasing are under the requirements needed for the PlayStation 5. The one I’d recommend is the WD Black SN850 that we have recently reviewed on CGMagazine or we have a guide of the best SSD’s for the PS5 here.
| Type | Requirement |
|---|---|
| Interface | PCIe Gen 4.0 (x4) M.2 NVMe SSD |
| Capacity | 250GB, 500GB, 1TB, 2TB or 4TB |
| Heatsink | Required – either built-in or added yourself |
| Sequential reads | 5500MB/s recommended |
| Form factor | 2230, 2242, 2260, 2280 or 22110 |
| Total size w/ heatsink | 110 x 25 x 11.25 millimetres4.33 x 0.984 x 0.442 inches |
| Heatsink max height (below SSD) | 2.45 millimetres0.096 inches |
| Heatsink max height (above SSD) | 8 millimetres0.314 inches |
There are also some side-notes provided by Sony which are the following
- Both single-sided and double-sided M.2 SSD are supported
- During the first installation process, you will need to format the drive, but doing that will erase all data on the Playstation 5 so you have to make sure you have nothing important left inside before doing this.
- When saving data onto the M.2 NVMe, do not turn off the Playstation 5 during the process. There is a potential risk of data being lost, or even corrupted and this could damage the NVMe or the Playstation 5.

- Officially licensed M.2 SSD for PlayStation 5 consoles (For PlayStation 5 firmware compatibility, please visit SN850 HS PS5 page on WD_BLACK site.).date transfer rate:7000.0 megabytes_per_second.Specific uses: Gaming
- All-in-one heatsink SSD design installs easily in the M.2 expansion slot
How to install the M.2 SSD/NVMe
Before anything else, make sure that you unplugged your Playstation 5 and it’s at room temperature, safety comes first when it comes to any handling of electronics. You will also be needing a phillips screwdriver to remove the cover of the console
Step 1: Positioning

After you unplugged your Playstation 5, lay it on a flat surface with the PS logo facing down and the power button facing away from you.
Step 2: Cover Removal

Removing the cover is simple and it doesn’t require the screwdriver just yet. What you want to do is to grip the top and bottom of the cover and gently lift it up while sliding the top side downwards and it should pop right out.
Step 3: Preparing the M.2 slot

With the cover removed, the M.2 slot should be exposed, just remove the cover and inside the slot should be a single screw with a spacer. Remove the screw with the spacer out of the expansion connectors.
Step 4: Installing the M.2

Hold onto the edge of your M.2 with the heatsink attached to it and align the small notch with the corresponding slot depending on its size (make sure that the spacer is beneath it) as you firmly insert into the circuits. Then place the screw back into the expansion connectors. The end result should be your M.2 resting inside the slot without being obstructed from the cooling structure.
Step 5: The Closing
Now close everything up. Put the M.2 slot cover back into its location and screw it back in place. Afterwards you can reattach the Playstation 5 Cover back in, it should be fairly simple. Slide all of the hinges on that lids into the designated holes on the console and it should snap in place.
How to install applications into the M.2
Now that everything is all done and final, plug your Playstation 5 back into your monitor and boot up the console. Everything you download will still be directed to the console’s inner storage and you don’t want that. Head over to the Settings > Storage > Installation Location to redirect all installations to the M.2.
If you want to view how much left your M.2’s storage space has, go back to the home screen and go into Settings > Storage > M.2 SSD Storage.
With the new firmware updates for M.2 support, the Playstation 5 stands out amongst its other competitors such as Xbox. Storage problems are no longer a thing, you will be able to flex to your friends that you got 4TB allocated into your console so that you won’t be needing to delete any more games to make room for new ones (For at least a long time).